


Connect to an lnd node, and perform transactions on the Bitcoin Lightning network. Also connect to a tapd node to mint and transact Taproot Assets.
This is a Wallet Adapter for Bitcoin and Altcoin Wallets version 6.1.4 or later. Wallet adapters connect the plugin with various wallet APIs. Use this adapter to connect to an lnd node and a tapd node. lnd and tapd are wallets implementation from Lightning labs.
screenshots
![[wallets_lnd_deposit currency_id="123" amount="0.00000420" description="Pay for coffee"]](https://www.dashed-slug.net/wp-content/uploads/2023/07/shortcode_lnd_deposit_payment_1.png)
![[wallets_lnd_deposit currency_id="123" amount="0.00000420" description="Pay for coffee"] after user clicks "Proceed to payment"](https://www.dashed-slug.net/wp-content/uploads/2023/07/shortcode_lnd_deposit_payment_2.png)
![[wallets_lnd_deposit currency_id="123" amount="0.00000420" description="Pay for coffee"] after user pays the invoice.](https://www.dashed-slug.net/wp-content/uploads/2023/07/shortcode_lnd_deposit_payment_3.png)
![[wallets_lnd_withdraw currency_id="123"]](https://www.dashed-slug.net/wp-content/uploads/2023/07/shortcode_lnd_withdrawal_1.png)
![[wallets_lnd_withdraw currency_id="123"] after user pastes or scans an LNURL. The remaining fields are filled in automatically.](https://www.dashed-slug.net/wp-content/uploads/2023/07/shortcode_lnd_withdrawal_2.png)
![Depositing a Taproot Asset with the [wallets_tapd_deposit] frontend UI. First, the user specifies the amount to deposit.](https://www.dashed-slug.net/wp-content/uploads/2024/02/shortcode_tapd_deposit_1.png)
![Depositing a Taproot Asset with the [wallets_tapd_deposit] frontend UI. The wallet generates a deposit address for the asset and amount chosen. The address is displayed as a QR code.](https://www.dashed-slug.net/wp-content/uploads/2024/02/shortcode_tapd_deposit_2.png)
![Withdrawing a Taproot Asset with the [wallets_tapd_withdraw] frontend UI. First, the user enters a taproot address.](https://www.dashed-slug.net/wp-content/uploads/2024/02/shortcode_tapd_withdrawal_1.png)
![Withdrawing a Taproot Asset with the [wallets_tapd_withdraw] frontend UI. The plugin decodes the taproot asset and selects the correct asset, and amount. User can edit the comment message and click "Send" to withdraw the asset.](https://www.dashed-slug.net/wp-content/uploads/2024/02/shortcode_tapd_withdrawal_2.png)
features
- admin can
- connect to an lnd wallet
- view version of lnd implementation
- view public key of connected lnd node
- view synced block height of lnd node
- view connectivity errors
- view inbound and outbound liquidity of node
- view connected peers count
- view active channels count
- attach a currency to the lnd wallet
- use shortcodes to add a frontend UI to
- let users deposit funds via Layer 2 invoice
- let users pay for other things besides deposits via Layer 2 invoice
- attach PHP code to successful custom payment
- let users withdraw from their balance to an external invoice
- connect to a tapd wallet
- view version of tapd implementation
- view public key of connected lnd node
- view synced block height of tapd node
- view connectivity errors
- view taproot assets minted on the wallet
- mint new fungible taproot assets on the wallet
- single issuance assets
- multiple issuance assets (asset groups)
- use shortcodes to add a frontend UI to
- let users deposit taproot assets
- let users withdraw taproot assets
- modify the messages of the frontend UIs using WordPress filters
- connect to an lnd wallet
- user can
- deposit funds on Layer 1 using the
[wallets_deposit]UI (this uses passthrough to bitcoin-core backend through the lnd REST API) - deposit funds on Layer 2 using the
[wallets_lnd_deposit]UI- user sees whether payment was successful via UI polling
- pay for custom PHP actions on Layer 2 using the
[wallets_lnd_deposit]UI- user sees whether payment was successful via UI polling
- withdraw funds on Layer 1 using the
[wallets_withdraw]UI (this uses passthrough to bitcoin-core backend through the lnd REST API) - withdraw funds on Layer 2 using the
[wallets_lnd_withdraw]UI- user can optionally use a mobile device’s camera to scan an LNURL payreq
- deposit taproot assets using the
[wallets_tapd_deposit]UI - withdraw taproot assets using the
[wallets_tapd_withdraw]UI
- deposit funds on Layer 1 using the
installation
This extension connects directly to an LND wallet.
A few things to note before installation:
- An LND node has multiple options for the wallet backend:
- A full Bitcoin core node. This takes up a lot of disk space on your server.
- A lightweight Neutrino wallet. This backend is built in to LND, and does not use a lot of disk space because it does not store the blockchain locally.
- Btcd
- An LND node can connect to:
- Bitcoin
- Litecoin
- It is possible, but not recommended to install
lndon its own. In most cases you want to install Lightning Terminal. This is a bundle of software from Lightning Labs which includes LND and also Loop, Pool, and Faraday. These are additional software for managing the wallet via a graphical web interface, and for managing channels. If you only installlnd, you will have to manage your channels from the command line, and this is very much harder. - The wallet adapter connects to LND via its REST API. It does not use the
gRPCinterface. - You should study the Builder’s guide to LND, including how to backup your wallet in case your node crashes.
Installing Lightning Terminal
NOTE: For reference, the official installation instructions for the Lightning Terminal are here: https://docs.lightning.engineering/lightning-network-tools/lightning-terminal/get-lit
We are going to install the binary bundle. The bundle includes all the daemons we need, and is available from here:
https://github.com/lightninglabs/lightning-terminal/releases1 Connect via SSH to your server
2 Ensure that you have tar and wget installed. Run the following command:
sudo apt install tar wget3 Go to https://github.com/lightninglabs/lightning-terminal/releases
4 Select the release that’s suitable for your architecture. To find out your CPU’s architecture, use lscpu:
$ lscpu | fgrep -i Architecture
Architecture:                    x86_64
In this case we will select the latest linux-amd64 build.
As of writing these instructions, the latest is v.0.10.1-alpha. Let’s download it to our home directory.
5 Use wget to download the right binary, in this case lightning-terminal-linux-amd64-v0.10.1-alpha.tar.gz:
wget https://github.com/lightninglabs/lightning-terminal/releases/download/v0.10.1-alpha/lightning-terminal-linux-amd64-v0.10.1-alpha.tar.gz6 Once downloading completes, extract it with:
tar xfv lightning-terminal-linux-amd64-v0.10.1-alpha.tar.gz7 Install all the binaries to /usr/local/bin with:
sudo cp lightning-terminal-linux-amd64-v0.10.1-alpha/* /usr/local/binOnce the binaries are installed, you may delete the downloaded tar file and this directory to save space on your server:
rm -rf lightning-terminal-linux-amd64-v0.10.1-alpha.tar.gz lightning-terminal-linux-amd64-v0.10.1-alpha8 Create a new configuration file lit.conf for lit (the Lightning terminal bundle).
An example config for ~/.lnd/lnd.conf lnd is here:
https://www.lightningnode.info/advanced-tools/lnd.confDo NOT create this file on your server. We are NOT going to run lnd independently. Instead, we will create a config for litd, the software bundle:
mkdir ~/.lit && touch ~/.lit/lit.confThe litd config can include configs for lnd, loop, pool, etc, but all lines must be prefixed with the name of the daemon they are for.
The documentation for the lnd config is at:
https://github.com/lightningnetwork/lnd/blob/master/sample-lnd.confFor example: If you want to use the setting bitcoin.active=1 which activates Bitcoin, you would enter the following to ~/.lit/lit.conf:
lnd.bitcoin.active=trueNote the lnd. prefix above, which indicates that this ~/.lit/lit.conf line is for lnd.
9 Edit the ~/.lit/lit.conf file with your favorite text editor. Create a typical config for litd using the following example settings:
lnd-mode=integrated

uipassword=ENTER_A_PASSWORD_HERE_FOR_THE_WEB_INTERFACE

network=mainnet
httpslisten=0.0.0.0:8443

lnd.debuglevel=info

lnd.feeurl=https://nodes.lightning.computer/fees/v1/btc-fee-estimates.json

lnd.listen=0.0.0.0:9735
lnd.listen=[::1]:9736
lnd.rpclisten=localhost:10009
lnd.restlisten=0.0.0.0:8080

lnd.bitcoin.active=true

lnd.bitcoin.node=neutrino
Don’t forget to enter a strong password for the web interface.
Optionally, in the above listen lines, replace 0.0.0.0 with the public IPv4 address of the server running litd. This is somewhat more secure, as the litd server will only listen on the NIC for the internet network.
10 You can optionally configure Tor for your node.
Follow the instructions to first install Tor, then configure Tor for use with LND. You may end up adding something like the following to your lit.conf:
lnd.tor.active=1
lnd.tor.dns=nodes.lightning.directory
lnd.tor.socks=127.0.0.1:9050
lnd.tor.streamisolation=false
lnd.tor.skip-proxy-for-clearnet-targets=1
lnd.tor.password=THIS_SHOULD_MATCH_YOUR_HashedControlPassword
lnd.tor.v3=true
lnd.tor.control=localhost:9051
lnd.tor.targetipaddress=
Again, note the lnd. prefix for setting tor settings.
11 You should not simply run litd from the command line. Instead, create a service for it. Assuming your Linux installation uses systemv, create a new unit file:
sudo touch /etc/systemd/system/litd.service12 Use your favorite text editor with sudo to fill the file with the following contents:
[Unit]
Description=Lightning Terminal Network Daemon

[Service]
ExecStart=/usr/local/bin/litd
ExecStop=/usr/local/bin/lncli --network=mainnet stop

# Replace these with the user:group that will run lnd

User=alexg
Group=alexg

# Try restarting lnd if it stops due to a failure

Restart=on-failure
RestartSec=60

# Type=notify is required for lnd to notify systemd when it is ready

Type=notify

# An extended timeout period is needed to allow for database compaction
# and other time intensive operations during startup. We also extend the
# stop timeout to ensure graceful shutdowns of lnd.

TimeoutStartSec=1200
TimeoutStopSec=3600

# Hardening Measures
####################
# Mount /usr, /boot/ and /etc read-only for the process.

ProtectSystem=full

# Disallow the process and all of its children to gain
# new privileges through execve().

NoNewPrivileges=true

# Use a new /dev namespace only populated with API pseudo devices
# such as /dev/null, /dev/zero and /dev/random.

PrivateDevices=true

# Deny the creation of writable and executable memory mappings.

MemoryDenyWriteExecute=true

[Install]
WantedBy=multi-user.target
13 Next, enable this unit with:
sudo systemctl enable litd.service14 Now you can start the service with:
systemctl restart litd.serviceOr, alternatively with:
sudo service litd restart15 Check to see the status of the service. The service should be shown as active (running). You may see something like:
$ sudo service litd status
● litd.service - Lightning Terminal Network Daemon
     Loaded: loaded (/etc/systemd/system/litd.service; enabled; vendor preset: enabled)
     Active: active (running) since Tue 2023-07-11 16:02:51 EEST; 1min 12s ago
   Main PID: 2081 (litd)
     Status: "Wallet locked"
      Tasks: 8 (limit: 2324)
     Memory: 97.9M
        CPU: 7.073s
     CGroup: /system.slice/litd.service
             └─2081 /usr/local/bin/litd
Press q to exit from the service status.
16 If you want to view the logs for lnd, do the following in another terminal:
tail -f ~/.lnd/logs/bitcoin/mainnet/lnd.logIf you have installed litd with a Neutrino backend, the logs should indicate that lnd is downloading “cfheaders filters”.
17 You should now create a new wallet with:
lncli createMake sure to write down the seed somewhere safe.
This command has created a new LND wallet at ~/.lnd/data/chain/bitcoin/mainnet/wallet.db.
In the same directory, you will find several *.macaroon files.
Macaroons are authentication credentials similar to cookies that were developed by Google. Macaroon files are used to give access to parts of the LND API. To learn more about LND macaroons, see:
https://docs.lightning.engineering/lightning-network-tools/lnd/macaroonsThe macaroons are bearer access tokens which give various types of access to your LND wallet. The most permissive macaroon is the admin.macaroon, giving full access to your wallet.
18 Now that a wallet is created, you can use it’s password to unlock it. You must do this manually every time the litd service restarts. For example, if the server restarts, then the litd service will also restart. This is done to ensure that the password for the wallet file is not stored on server.
Unlock the wallet with:
lncli unlockand enter your wallet password.
You should see:
$ lncli unlock
Input wallet password:

lnd successfully unlocked!
$
19 Once you see in the logs:
2023-07-11 16:29:21.168 [INF] LNDC: Waiting for lnd to be fully synced to its chain backend, this might take a whileThis means that your wallet is syncing and is not yet ready for use.
While syncing is in progress, we can proceed to connect the wallet to the plugin.
20 After the wallet is unlocked we can run the getinfo command via the command line to see our node’s public key and other information:
lncli getinfoWe can also visit the following URL to enter the graphical interface:
https://example.com:8443/Where example.com should be replaced with the domain name or IP of your wallet server.
If the browser complains about a missing certificate, you can ignore the warning and proceed. If you wish to install the TLS certificate, it is located in ~/.lit/tls.cert.
Use the uipassword that you specified in ~/.lit/lit.conf to login to the UI.
21 Now proceed to Connect to Terminal. Use the Terminal to open channels to the Lightning network.
How you do this is beyond the scope of this article. A good place to start reading about this is:
https://docs.lightning.engineering/lightning-network-tools/lightning-terminal/opening-channelsInstalling the lnd Wallet adapter
22 You must install the adapter on a server that has the php-curl module installed and activated. If necessary, you can do the following on the WordPress server:
sudo apt update
sudo apt install php-curl
You should then restart your webserver with sudo service nginx restart or sudo service apache2 restart.
23 Download the latest version of the wallet adapter, from:
https://www.dashed-slug.net/bitcoin-altcoin-wallets-wordpress-plugin/lnd-wallet-adapter-extension24 Login to your WordPress installation where Bitcoin & Altcoin Wallets is already installed, and go to: Plugins → Add new → Upload Plugin.
25 Upload the wallet adapter .zip file and activate it.
26 If you are installing Lightning to use with Bitcoin and you already have a wallet for Bitcoin core, you should probably disable the existing wallet.
Similarly, if you are using Bitcoin with the CoinPayments wallet, then remove Bitcoin from your adapter.
This is not strictly necessary, but you likely want to use both Layer1 and Layer2 for Bitcoin via the lnd wallet.
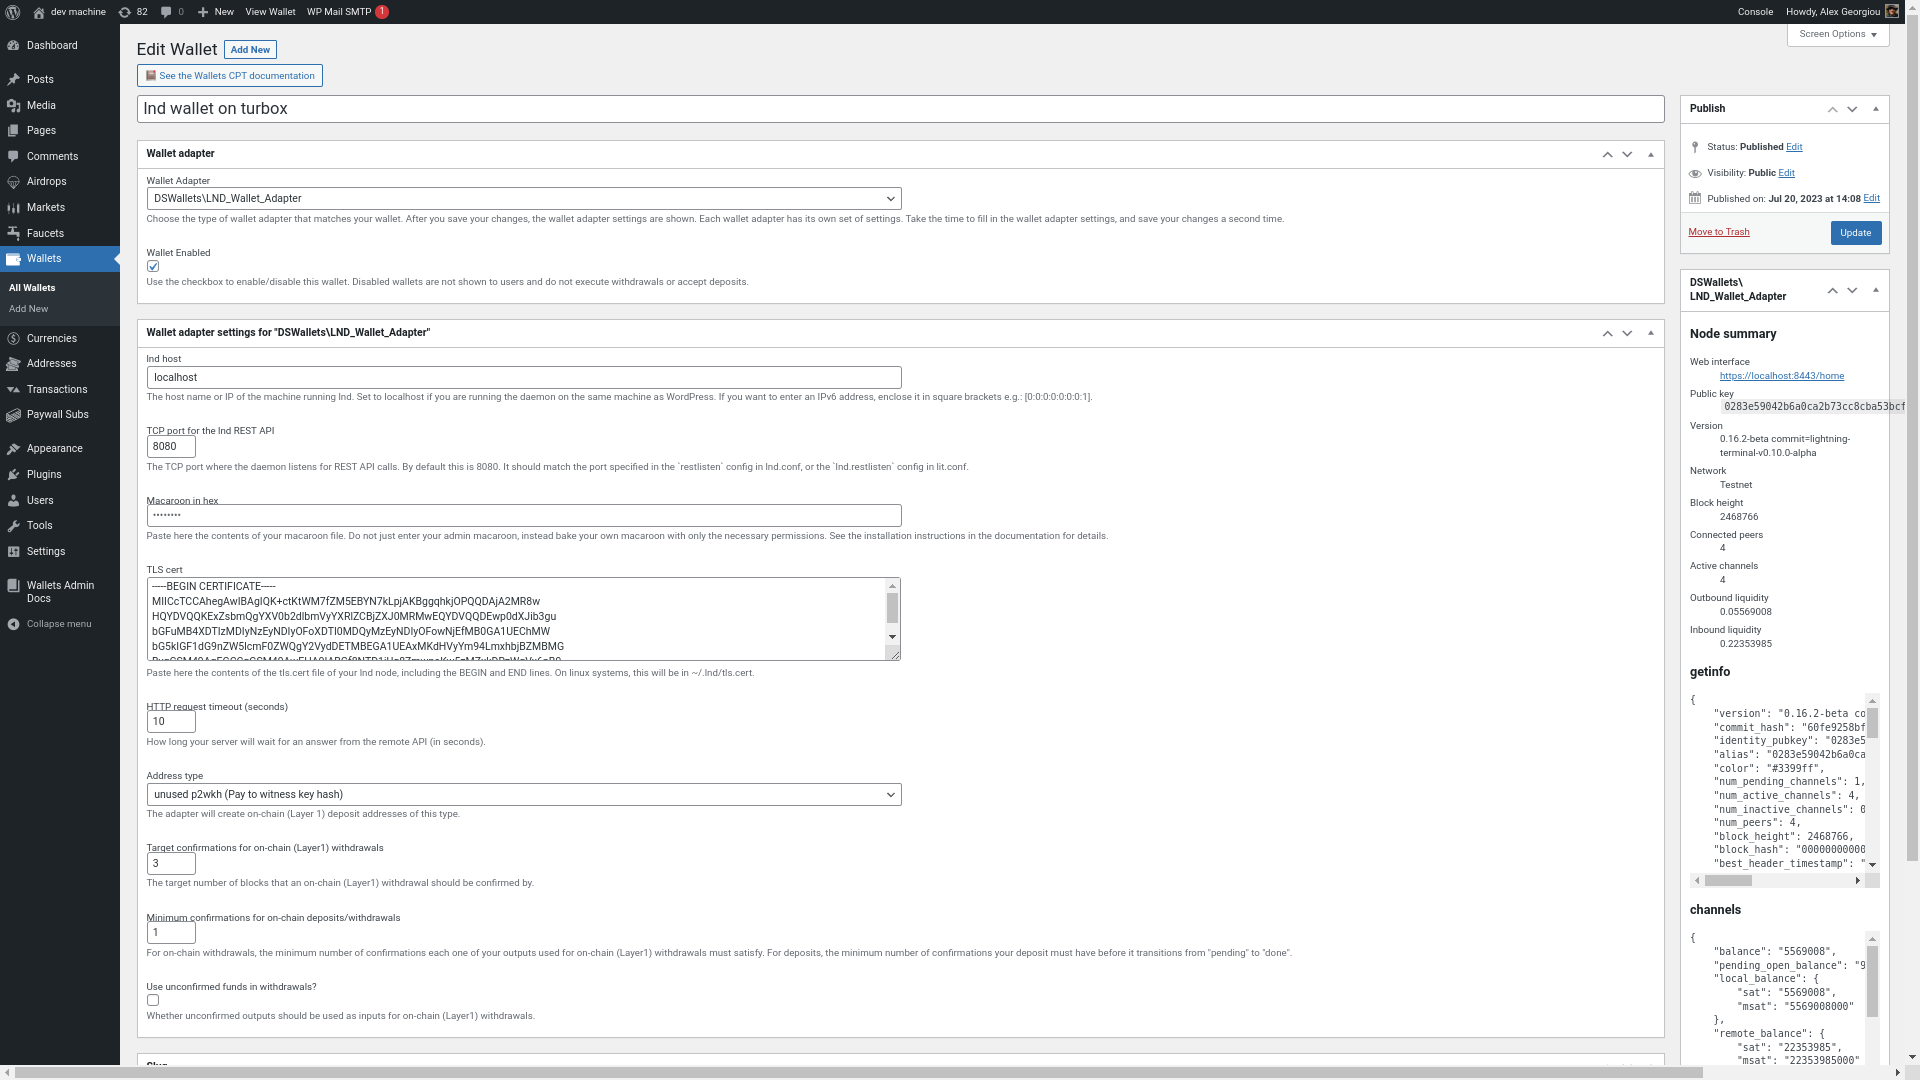
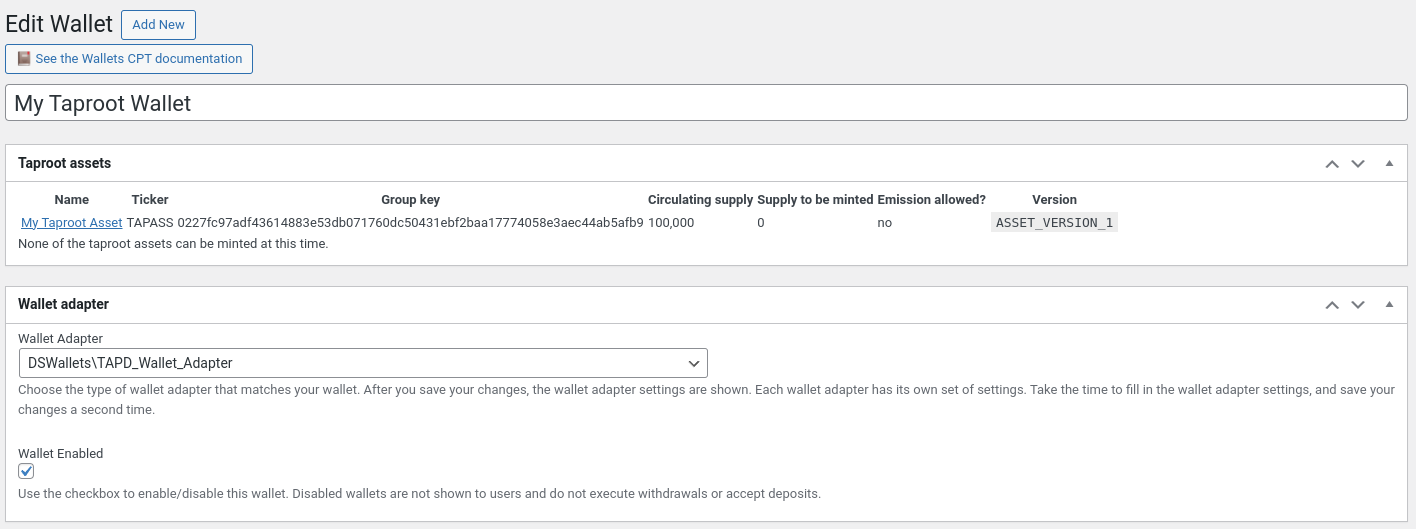
27 Go to Wallets → Add new to create a new Lightning wallet.
28 Enter a title such as “Bitcoin mainnet lnd node”.
29 Set the Wallet adapter for this wallet to DSWallets\LND_Wallet_Adapter.
30 Set the wallet to Enabled and hit the Update button. Fields for the settings that are specific to this adapter will appear.
31 Enter the hostname or IP address to the server running litd.
32 Enter the port number for the REST API, which should be 8080 by default.
33 Bake a new macaroon with the right permissions and enter it to the wallet adapter settings in the Macaroon in hex field. Macaroons are fancy cookies. Think of them as access tokens, similar to cookies. They are long strings of bytes, encoded as hex strings, that give to the bearer of the token access to various endpoints.
You could enter the contents of the admin.macaroon for testing purposes. You can view your admin macaroon as hex with the following command:
xxd -p ~/.lnd/data/chain/bitcoin/mainnet/admin.macaroon | tr -d '\n'This will make the adapter work. HOWEVER, the admin macaroon is way too permissive, and it is NOT recommended that you use it.
To enhance security, you should bake a new macaroon that allows access only to the REST API endpoints that are used by the adapter. Also, you can restrict the macaroon to be valid only when used from your WordPress IP address.
Here’s the command to bake a more restrictive macaroon (replace 127.0.0.1 with the public IP address of your WordPress site):
lncli bakemacaroon \
    --ip_address 127.0.0.1 \
    uri:/invoicesrpc.Invoices/LookupInvoiceV2 \
    uri:/lnrpc.Lightning/AddInvoice \
    uri:/lnrpc.Lightning/DecodePayReq \
    uri:/lnrpc.Lightning/GetInfo \
    uri:/lnrpc.Lightning/GetTransactions \
    uri:/lnrpc.Lightning/ListInvoices \
    uri:/lnrpc.Lightning/NewAddress \
    uri:/lnrpc.Lightning/SendCoins \
    uri:/lnrpc.Lightning/SendMany \
    uri:/lnrpc.Lightning/SendPaymentSync \
    uri:/lnrpc.Lightning/WalletBalance \
    uri:/lnrpc.Lightning/ChannelBalance \
    uri:/lnrpc.Lightning/QueryRoutes \
    uri:/lnrpc.Lightning/LookupInvoice
This command will print out a long hex string that represents all the permissions we need, plus the IP address filter. Enter this hex sting into the Macaroon in hex field. This gives to the wallet adapter access to the endpoints it needs and no others. Even if a hacker were to obtain this macaroon, it cannot be used to access your wallet from other IP addresses.
35 Enter your TLS certificate for this node and wallet. To find out your public certificate, run this command:
cat ~/.lit/tlc.cert36 Leave the remaining settings as they are. Hit the Update button.
37 Check the right hand of the screen, under the metabox titled DSWallets\LND_Wallet_Adapter. If the adapter is connected, you should be seeing information about your node. If there is a proble, you will see an error message in red text.
38 If you already have a Bitcoin currency, re-attach it to the new LND wallet. If not, create a new Bitcoin currency and attach it to this wallet.
Installing the Taproot Assets daemon
39 Install the latest tapd release appropriate for your system, from the following link:
https://github.com/lightninglabs/taproot-assets/releasesFor example, if you are on a typical Linux server with a 64-bit CPU, you may select:
taproot-assets-linux-amd64-v0.3.2.tar.gzVersion 0.3.2 is the latest at the time of writing these instructions. You should select the latest released version.
40 Download the tarball on your server. Continuing with the above example:
wget https://github.com/lightninglabs/taproot-assets/releases/download/v0.3.2/taproot-assets-linux-amd64-v0.3.2.tar.gz41 Extract the binary files with:
tar xfv taproot-assets-linux-amd64-v0.3.2.tar.gz(remember to change the filename to the files you downloaded)
42 Install the binaries in /usr/local/bin:
sudo mv taproot-assets-linux-amd64-v0.3.2/tap* /usr/local/bin/(again, change the directory name to whichever package you downloaded)
43 We are going to run tapd in “integrated mode” (the default). Create a config file for tapd.
    mkdir ~/.tapd
    nano ~/.tapd/tapd.conf
44 We are going to use the TLS certificate from lnd for tapd. Enter the following into tapd.conf:
    tlscertpath=~/.lnd/tls.cert
    tlskeypath=~/.lnd/tls.key
45 We are going to specify the network interface that tapd will listen on, as well as the port number, where the default port is 8089.
For example, if the WordPress server is running on the same host, then we will want to bind on 127.0.0.1 (the address of the loopback interface).
If the WordPress server is running on a different host, then we will specify the public IP of the host where tapd is running.
This will tell the tapd daemon to only listen on the correct network, and to disallow connections from other network interfaces. We do this for extra security.
In our example, we are running WordPress on the same host, so we will want to use the loopback interface, so we will add the following to the tapd.conf file:
restlisten=127.0.0.1:8089If we wanted to allow connections from any interface, we would instead specify:
restlisten=127.0.0.1:8089NOTE: If you are connecting from a different host, you MUST check that any firewalls in place allow incoming connections to TCP port
8089. If you are on a managed host, check with your hosting provider.
46 Save the .conf file and start the daemon with:
tapd47 Go to your WordPress site where you have installed the Lnd and Tapd Wallet adapter. Create a new wallet by navigating to: Wallets → Add New.
48 Enter a name for your new wallet in the Wallet’s title field. For example “My taproot assets wallet”.
49 Set the wallet adapter to DSWallets\TAPD_Wallet_Adapter.
50 Check wallet enabled and hit the Update button to see the remaining adapter settings.
51 In tapd host enter the IP address of the host where tapd is running.
52 In tapd port enter the port that you specified above in the restlisten= line. The default is 8089.
53 To get the macaroon as a hexadecimal string, execute the following command on the host running tapd:
xxd -p ~/.tapd/data/mainnet/admin.macaroon | tr -d '\n'Paste the hex string in to the field. This will authorize the plugin to use the tapd API endpoints.
54 In the TLS cert field, copy the contents of the certificate file that you specified in the .conf file.
In our example, execute the following on your server to see the public certificate’s contents:
cat ~/.lnd/tls.cert55 Save the setting using the Update button.
56 Check the DSWallets\TAPD_Wallet_Adapter panel on the right hand side of the screen:
- If everything is OK, then you should see the following information:
- Public key
- Tapd Version
- Lnd Version
- Synced to chain
- If you have not entered the correct TLS certificate, you will not see any of the above data.
- If you have entered the macaroon incorrectly, you will instead see one of the following errors:
REST API call failed with code 2 and error message: encoding/hex: odd length hex stringREST API call failed with code 2 and error message: verification failed: signature mismatch after caveat verificationREST API call failed with code 2 and error message: encoding/hex: invalid byte:
- If the connection was not successful, you will see instead:
Could not communicate with tapd node. Error 7: Couldn't connect to server
If connection was not successful, check any firewalls protecting your tapd host. The TCP port 8089 must be accessible. Contact your hosting provider if needed.
57 As with lnd, you will want to setup tapd as a service.
Assuming your Linux installation uses `systemv`, create a new unit file:
sudo touch /etc/systemd/system/tapd.service58 Use your favorite text editor with sudo to fill the file with the following contents:
    [Unit]
    Description=Taproot Assets Daemon

    [Service]
    ExecStart=/usr/local/bin/tapd
    ExecStop=/usr/local/bin/tapcli --network=mainnet stop

    # Replace these with the user:group that will run lnd

    User=alexg
    Group=alexg

    # Try restarting tapd if it stops due to a failure

    Restart=on-failure
    RestartSec=60

    # Type=notify is required for tapd to notify systemd when it is ready

    Type=notify

    # An extended timeout period is needed to allow for database compaction
    # and other time intensive operations during startup. We also extend the
    # stop timeout to ensure graceful shutdowns of tapd.

    TimeoutStartSec=1200
    TimeoutStopSec=3600

    # Hardening Measures
    ####################
    # Mount /usr, /boot/ and /etc read-only for the process.

    ProtectSystem=full

    # Disallow the process and all of its children to gain
    # new privileges through execve().

    NoNewPrivileges=true

    # Use a new /dev namespace only populated with API pseudo devices
    # such as /dev/null, /dev/zero and /dev/random.

    PrivateDevices=true

    # Deny the creation of writable and executable memory mappings.

    MemoryDenyWriteExecute=true

    [Install]
    WantedBy=multi-user.target
59 Next, enable this unit with:
sudo systemctl enable tapd.service60 Now you can start the service with:
systemctl restart tapd.service
Or, alternatively with:

    sudo service tapd restart
61 Check to see the status of the service. The service should be shown as active (running). You may see something like:
$ sudo service tapd status
● tapd.service - Taproot Assets Daemon
Loaded: loaded (/etc/systemd/system/tapd.service; enabled; vendor preset: enabled)
Active: active (running) since Tue 2024-02-02 15:01:47 EEST; 2min 31s ago
Press q to exit from the service status.
62 If you want to view the logs for tapd, do the following in another terminal:
tail -f ~/.lnd/logs/mainnet/tapd.logCreating your first taproot asset
Once you have set up
tapdto run as a service and connected the Wallet Adapter successfully, you may want to create your first Taproot Asset. Follow the following steps, and repeat them for each asset that you would like to mint:
63 Go to Currencies → Add New.
64 Enter a title. This will be the name of your currency.
65 Enter a ticker symbol for your currency. Try not to use something that is already in widespread use.
66 Under Wallet, select the Taproot assets wallet that you created above in step 47.
67 In the Decimal Places field, enter how many decimal places (subdivisions) you would like your currency to have.
This only affects how amount are displayed. In the underlying protocol, there are only integer units of your asset. For example, if you issue 1,000,000 (one million) units of an asset, and set the decimals to be 2, then users will see on your site an asset with an issuance of 10,000.00 and the smallest possible amount will be 0.01 units of your asset. If you do not want your units to be subdivisible, enter 0.
68 Leave the remaining fields empty for now, and hit the Publish button.
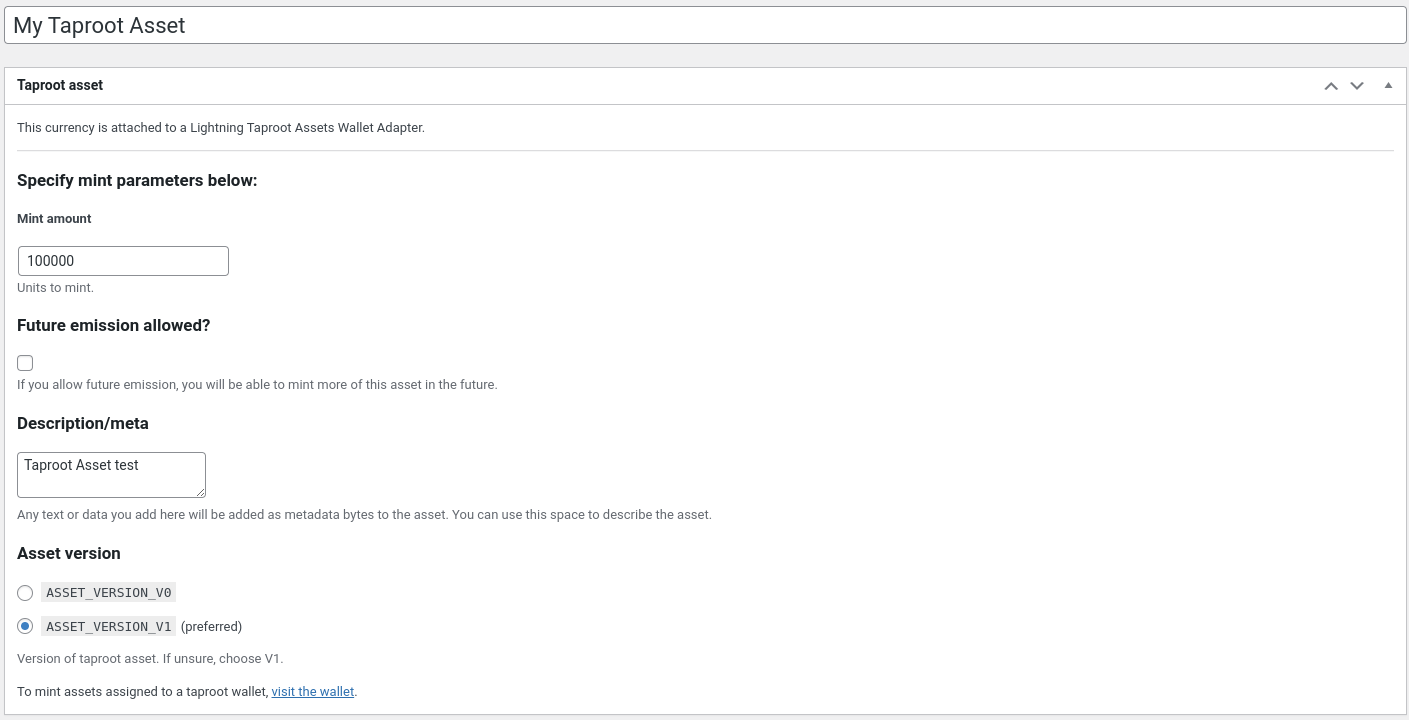
69 Check that your currency now has the taproot-asset tag assigned. There should be a new Taproot asset panel below the asset’s name. Here you can specify how the asset will be minted.
70 In mint amount enter the amount to be minted. This is an integer amount. In our example above, to mint a million assets you would enter 1000000 regardless of what you entered in Decimal Places.
71 Check Future emission allowed? if you want to be able to issue more of this asset later. If you don’t check this box, then users of your asset will know that your asset is deflationary and that its value will not be diluted in the future.
72 Enter any descriptive text in the Description/meta box. This information could be any text and it will be attached to the asset. For example it could be a URL to your asset’s homepage.
73 Choose ASSET_VERSION_V1 unless you have a good reason not to.
74 Hit the Update button to confirm the issuance settings you entered.
NOTE: Minting an asset costs fees on the blockchain. If you plan to mint more than one assets, you can batch them all in one transaction to save on fees. At this step you can go back to step 63 to queue more assets for minting. Once you are done specifying all the assets that you plan to mint, continue to the next step 75:
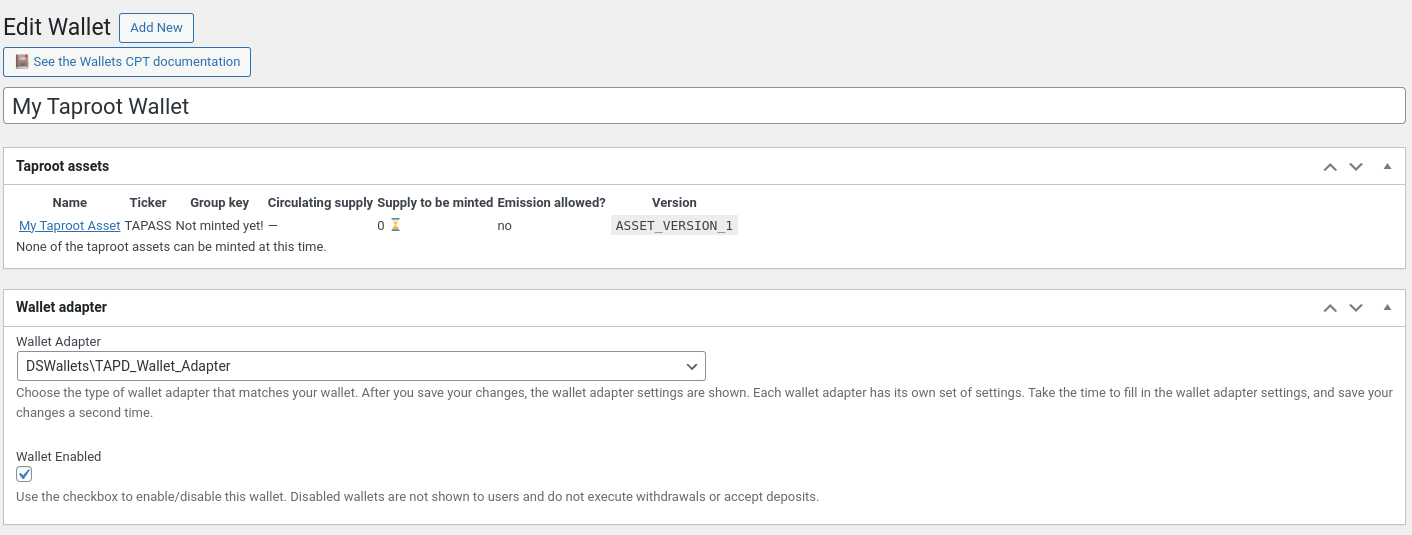
75 Visit the tapd wallet that your assets are attached to.
76 Under the wallet’s title, you will see a Taproot assets panel. Any taproot assets attached to this wallet are listed, and their mint status is detailed. As long as there is at least one asset that has not been fully minted yet, there will be a button available to mint the remaining assets. Click on the Mint 1 asset button.
77 Wait for a few minutes until the asset is minted. The asset (or assets) will be minted in one of the next cron job runs. As long as the asset has not yet been minted, there will be an hourglass symbol (⌛) next to it. The asset’s currency entry will have the mint-pending tag.
78 Once the asset is minted, the Currency entry will lose the mint-pending tag and will gain the minted tag. The currency issuer will receive a deposit entry with the minted balance, and will be notified by email.
Congratulations, your assets are now minted. You can go on to the Frontend & Settings section of the documentation to find out about the UIs that you can offer your users for transacting taproot assets.
downloads
This is a free plugin extension available to all subscribers.
This extension requires Bitcoin and Altcoin Wallets version 6.2.4 or later. You cannot use it with previous versions of the parent plugin.
-
Bitcoin_
and_ Altcoin_ Wallets:_ lnd_ and_ tapd_ Wallet_ Adapter_ extension-0.4.0-beta-wordpress-plugin.zip - 0.4.0-beta -
Bitcoin_
and_ Altcoin_ Wallets:_ lnd_ and_ tapd_ Wallet_ Adapter_ extension-0.3.0-beta-wordpress-plugin.zip - 0.3.0-beta -
Bitcoin_
and_ Altcoin_ Wallets:_ lnd_ Wallet_ Adapter_ extension-0.2.0-beta-wordpress-plugin.zip - 0.2.0-beta -
Bitcoin_
and_ Altcoin_ Wallets_ lnd_ Wallet_ Adapter_ extension-0.1.0-beta-wordpress-plugin.zip - 0.1.0-beta
Subscribe for free and get access to all the wallet adapters.
documentation
As of Bitcoin and Altcoin Wallets version 6.0.0, the documentation can be accessed from the WordPress admin screens. Look for Wallets Admin Docs in the Admin menu.
Note that the documentation is only shown to administrators (users with the manage_wallets capability).
Previous versions of the plugin and its extensions had documentation in the form of an accompanying PDF file. This has now been replaced with markdown files placed in the source code directories of each component.
support
Please use the appropriate support forum:
- For all issues and inquiries regarding the parent plugin, Bitcoin and Altcoin Wallets, you can use the support forum on WordPress.org. You may also use the General discussion forum on dashed-slug.net.
- The support forum for this extension is here.
You are welcome to send in any problems, questions, suggestions, thoughts, etc.
For all other communication, such as questions and issues regarding membership, you can email me.